How to Start a Fire in a Survival Situation | Basic Instincts | WIRED
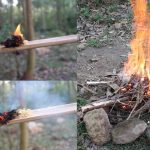
– Fire is one of the most importantand powerful of theprimitive technologies. It unlocked all sorts of potentialsfor us on every level. My name is Bill Schindler. I’m a professor ofarchaeology and anthropologyat Washington College anda primitive technologistand experimental archaeologist. Fire probably started as some sortof a natural phenomenon,like a lightning strike. A forest fire would havedrawn our attention,we would have seen it and probablystarted to realize thebenefits of fire over time. We could probably smell the cooked meatof the animals that weretrapped in that fireand not only died, but were also cookedas a result of that. We certainly would have seen the light,we would have experienced the warmthand the first sort of harnessing of firewas probably making sure thatthat flame didn’t go out. We could take that fire andtransport it somewhere else. Fire requires just three things:oxygen, fuel and heat. The oxygen is already present in the air,the fuel can be any combinationof things that will actually catch flameand hold that energy it can be wood,it can be dung, it can be grasses. What we really need tofocus on here is the heat. How is the heat generatedand where does it come from?Most primitive andancestral approaches to firerely upon friction to generate that heat. The first thing that you need to doif you’re going to starta fire from scratchis to make or find a sharp edge. If you have a knife that’s a no brainer,but if you don’t, if you’rein a survival situationyou would have to create that sharp edgeby banging two rocks together to producethe sharp, durable edge and once you havethat sharp edge you cancut the pieces of woodthat you need and most importantlymodify their shape to suitthem to make the fire. The two most common waysof making a primitive fireare the hand drill and the bow drill. Let’s start with the most basic formof starting fire, a hand drilland this is where that saying,rubbing two sticks together comes from,but if you just grab two sticksand rub them together the only warmthyou’d be generating is your muscles movingfor hours on end, you’dnever create a fire. So in order to make a hand drill fireyou need two pieces,you need a hearth boardand you need a spindle that spins insideof the hearth board. Both of these pieces need to be bone dryand made out of the right materials. The hearth board needs tobe made out of somethingthat’s not resinous, so itcan’t be from a conifer,it can’t be hemlock or pine or spruceand it also has to be froma wood that’s somewhat soft. My test for finding out whether or notthis wood is the right type is to actuallyput my finger nail in it andsee if it leaves a dent behindif it does it’s probablythe right material. Here in the Eastern Woodlands I use woodfrom trees like basswood or tulip poplaror cedar they’re absolutely ideal. The spindle needs to not only be dry,but it needs to be straight and italso needs to be somewhat soft. Quick growing plants like cattailor horseweed or mulin oreven goldenrod work perfect. On materials like this horseweedthat have all these little knobs,these knobs are goingto tear your hands upand they need to be removed,so if you take your stone tooland hold it perpendicularyou can scrape them offand make it smooth. Once you’ve prepared the outsideof the spindle and cut it to lengthyou have to pay attention to the very end. This end, the largerend is gonna sit insidethe hearth board, insidethe notch you createand you have to make surethat it is a very clean cut. These little frayedpieces are gonna disruptthe dust pile that you’re spendingall this time creating,it’s gonna disperse itand you’re not gonna beable to start a fire. If it’s not, take that stone toolhold it perpendicular andvery gently scrape the edge. Once you’ve prepared your spindlethe single most important thingthat you have to rememberis not to put it downon the ground, even if youthink the ground is dryit’s not and if any moisturegets to the end of itit’s gonna be a failedattempt at making a fire. So once it’s prepared set it asidesomewhere that it’s gonna stay dry. The next thing that you need to do nowis prepare your hearth board. Your hearth board can be splitout of the proper size stick. I can split the end, I can carve it down,but what I’m really looking forwhen I’m ready to go is somethingthat’s about a quarter inchor 3/8 of an inch thick. It needs to be flat on the bottom,so it can sit there without rocking. So if you start with around stick like thisit can be split on both sidesor it can be carved down in orderto achieve those flat surfaces. After you’ve achieved that flat surfacewe need to create a divot in whichthe spindle’s gonna sit andspin without hopping out. The last thing you want todo is spend all your timeand effort so close to making a coaland then the spindle pops outand the entire thing has failedand you have to start all over again. So I’m gonna pick upthis flake that I madeand I’m gonna use it to create that divot. The nice thing about these stone flakesis that they have alldifferent surfaces on ’em,but I can start the divot with this partand I can widen it with this part. What I’m gonna do here is not actuallydo anything to start thefire, I’m gonna actuallyuse this spindle fora moment like a drill. I want to drill into that holeto ensure that it’s seated andit’s not gonna pop anywhere. So very slowly, very deliberatelywith some downward force I want to usethis spindle like a drill. I’ve created the divot that I needfor this spindle, but you’ll noticeI’m also creating thedust that’s accumulatingaround the outside of this hole. That dust will neverignite if it’s distributedaround the outside ofthat whole like that. I need to create a notchwhere all that dustwill fall in and make onesingle, solid, powerful hole. In order to do thatI’m gonna take my stoneand carve the notch andwhat I’m looking foris just like this onehere, it’s gonna look likea slice of pie or a slice of pizzaand the center of thatnotch should be aimingfor the center of that holeand it should broaden outon an angle of about 30 degrees or soby the time it reachesthe edge of the wood. Your final motion afteryou’re creating that notchshould always be downwardbecause you don’t wantany of those little fibers of the woodsticking up, it’s gonnadisrupt your abilityto form that really nice bundle. The next thing that I need to dowill determine the successor failure of this fire. I need to make sure everythingthat I need after a coal is createdis at my disposal in the right place. So the first thing that we needis a tinder bundle that’sgonna take that coalthat burning ember andblow it into a flame. I love to use cedar bark, the inner barkof the cedar tree is perfectfor this application. This is what it looks likewhen I pull it off the treeand in order to turnit into a tinder bundleI need to make sure that Iincrease the surface area,so that I can allow it to igniteat a lower temperatureand air to come through. So you can take it and move it like this,I’m breaking up andseparating those fibers. I need to split the difference betweenseparating this and allowinga lot of air to get throughand making sure thatthere’s not a big holein which the ember will fall through. Something around like this is perfectand just like with all my other materialsI don’t want to setthis on the damp ground. Once it’s done I’m gonna scoop upanything that’s fallen andstick it right back in. Okay, I’m gonna start this fireright here in front ofme, it has been rainingfor four days straight. This is actually the worst conditionsin which to try tostart a hand drill fire. However, you know one of the thingsthat I do need to worry about,which is not as big of an issue nowis the potential for this fire to spread,but I’m still gonna clearaway some of these leaves,you know I want to get right downto the bare, mineral soil. The other thing I need to do beforeI even attempt to make my hand drill fireis to get all of my wood ready,so what I want to do is take this woodand sort the size of it andI’ll start with the smallestand go to the biggest. Starting a hand drill fire in the woodsis an incredibly difficult thing to do,it requires a lot ofskill and a lot of energy. If you get to the pointwhere you actually get a coalthe last thing you wantto do is compromiseyour ability to make a fireby not having all your materials ready. It is worth the effortto spend five minutesdoing this to your wood. Okay, I have my woodready the final two piecesthat I need now that Ihave everything preparedin front of me is somethingto catch the ember. This piece of birch bark works greatI could use a very dryleaf, a small piece of woodand I’m gonna use this to put right underthat notch that I created andit’s gonna collect the dust. Once that dust is collected and it turnsinto an ember I cantake that and pick it upand very easily transferit into by tinder bundle. The final thing that I need is to havea little piece of a stick readybecause that ember,that dust is gonna workalmost like glue andit’s gonna want to stickto my hearth board and I’m gonna usethis little stick tohold that ember in placeas I remove the hearthboard, so I don’t disturb it. You need to make surethat this hearth boarddoesn’t move, one thingwe’ve done to accomplish thatis we flattened the bottomof the hearth board. The second thing that we could dois hold down the sides of it. If there’s somebody else with youhave them hold it, if there’s notyou’re gonna have tohold it with your footor you could take sticklike this and kneel on it. The spindle goes in place andyou have to lick your handsespecially on a cold day like this,my hands actually haveto grip this spindleand the spindle has to moveand you start nice and gentle. Things to look for:Make sure that the spindle bottomisn’t popping out of the hole. Make sure that there’s nothingthat’s interfering with your hands,if you feel like yourhands are starting to geta little bit dry, stop right nowand make sure you lick ’em again. I want to make sure thatI’m drying out that board,starting to heat it up,starting to generatethe dust and I can do thatby moving very, very slowly. The other thing I need to make surethat I’m doing is using my entire hand,every time that I spin my handsI’m rotating this spindle andit’s generating heat and dust,as soon as I stop it cools downand I go back the other way. If I use my entire hand fingertip to palmI’m getting more rotationsbefore it cools down. The other thing you’ll notice is ifyou’re generating downward pressure,which you should beyou’re hands are slowlygonna move down the shaft,when you get to the bottomyou’re gonna stop, hold it with one hand,continue to exert downward pressure,grab the top with the othercontinue to exert downward pressureand reposition your hands tothe top and continue again. This may take more than one go,but I would love to get it all in one,so that would be awesome. Son of a spindle broke. Let me try this way out. So you don’t want thishearth board to move,so the easiest way to do thatis with the side of your foot. All right so it’s cold, it’s dampmy hands are dry though and I’m tiredfrom trying to do this the best thingthat I can do right nowis take a quick break. I’m gonna take off this shirt. This is much better to showand my hands are doing the entire. . . I got it. Okay, we have the coal. We have to use this stickkeep the coal intactand we’re gonna let this coal grow. The more this coal growsthe stronger it getsand I’m gonna need all that strengthto transfer this really weak coalinto this tinder bundle. My job is to keep it in one place,in one ball if possiblewhen I transfer it. I’m blowing very gentlyto provide the oxygen. I’m holding it on the bottom becausethe flames are gonna go up. And we have flame. I’ll put this on the ground. I do not have a fire yetall I have is a flame. I’m gonna take my smallest pieces of woodand lay them on top. Laying these sticks on topnaturally form a teepeethat’s the shape it takes. We’re starting to get someof the smaller stuff lit. Right here the energy inthat system is building,it’s gone from tinder to something bigger,which means it’s getting strongerand slowly I’m gonna buildthe size of the sticks up. Then I’m done, that’s all I need to do. A bow drill is sort ofa hand drill on steroidsand a bow drill firerequires both a hearth boardand a spindle, but it also requiresa bow which instead of your hands is usedto spin the spindle. The advantage to that is that when you’reusing your hands to generate the heat,to spin the spindle you only havethe length of your hand to spin ituntil it stops for a momentand goes the other wayand that pause for that split secondallows this system to cool down. So if you can extend that distancethat you spin that spindlewithout having to stopand reverse the direction,it’s an incredible advantage. So if you take a bow, which is essentiallya stick with a string on itand wrap it around that spindleyou have the entire length of that stringto go in one directionwithout having to stopand move in the other direction. The other part of the bow drill,which provides an advantage is a handpieceand that handpiece sits on topof the spindle and providesthe downward pressure,so immediately by adding the bowand the handhold you’reincreasing the speed,you’re increasing the amount of rotationsbefore you stop and let it cool downand reverse direction andyou’re increasing the pressure. It’s a lot easier to make that fireand a lot quicker often to make that fire. So to make a bow drillyou need to make a bow,this curved piece of wood works great,but you can actually usealmost any piece of woodas long as you attach thespindle on the right wayso it’s on the outside of the stringeven a straight pieceof wood will work fine. But what you really need to doto make this successful is make a stringthat wraps around the spindleand there’s a number ofdifferent ways to do this,if you’re in a survival situationand you’re wearing shoesor boots with lacesyou can obviously use the laces,but other options include things likenatural plant fiberslike this dogbane here,which produces incredible fibers. You can extract these fibersand twist those fibersinto a really strong piece of cordage. The problem is there’s so much pressureand friction on this entire systemthat the natural vegetable fiberswear out rather quickly. My favorite way to make a bow drill stringis actually to userawhide or to use leather,this is a piece of brain-tanned deerskinand I’m gonna show you howto quickly make a stringthat’ll not only makethis fire successful,but you can use for successfulfires into the future. I can take this razor-sharp flakeand use it to cut this piece of leatherin a spiral pattern and I can makea really long string out of it. I’m gonna fold it overitself and I’m gonnamake a two ply cordage out of it,which is gonna more thandouble it’s strength,it’s also gonna makethis string more roundwhich is gonna make itmore successful for meand it’s also gonna make a loop on the endwhich will allow me to attachit very easily to the bow,so this is gonna be a two-ply cordageand in fact this is the waythat all ropes used to be made. I twist in opposite directionsjust like this and twistuntil it kinks on itselfand I’m gonna hold that end. All that I’m doing is I’m takingboth of these twistingthem in the same directionand then twisting themback around one anotherin the opposite directionand it’s gonna hold it tightand I’m gonna go right down the line. Twist and reverse, twist and reverse. Here’s the completed piece of cordageand what I’m able to do is use that loopand send it right throughand I’m gonna stick thisright on the end of my bow. I’ve made a small littlenotch here that’ll catch it. I’m gonna pull thatdown to this other notchgive it a little bit of slack,so it’ll wrap around the spindle,wrap it around a few times. This is my completed bow and string. This is the spindle that I usefor the bow drill fire, it’s shorterthan the hand drill spindleand it’s also bigger around. This end needs to be pointed,this is the end that’s upand fits in the handpiece,if this is pointedthere’s less surface contactand there’s less energy lossand I can shape that again with this rock. The bottom end needs to beflat or as flat as possible. The reason I’m making it flat is becauseI want that broad flat surfaceagainst the broad flat surfaceof the hearth board andthere’s more surface area,there’s more contact,there’s more frictionand there’s more heat. The only other piece of the bow drill setthat you need is the handle,this handle needs to be asfrictionless as possible,which means it should bemade out of a hard material. It can be made out of a strong,hard piece of wood like this osage orange,it can be made out of a shell,a hard bone or even a rockthat had a divot in it. So I need to create this divotinside of this handpiece so it can acceptthe far end of the spindle. If I’m making this on arock I can take another rockand peck the hole into it. If I’m making it on this piece of woodI can use my flake andtwist it just like thisto create this hole. Now I’m gonna make thatcoal with a bow drill. The similarities between a hand drilland a bow drill are thatthey both have a hearth boardand they both have a spindle,but the difference is that I’m gonna exertmy pressure using a handholdon top of the spindleand I’m gonna rotatethat spindle using a bowinstead of just my hands. The advantage here is that that spindlecan travel the entire length of the stringof the bow withoutstopping and cooling downas it reverses direction. The advantage to the handhold is thatI can exert a lot more pressureand I can use a lot shorter spindle. Positioning here is really importantthe first thing I’m gonna do just likewith the hand drill is put somethingunderneath the hearthboard to catch the ember. The second thing I’m gonnado is position my bodyso everything’s locked in placeand nothing is moving aroundand I’m gonna take my left hand. Which is the hand that’sholding the top of the spindleand lock it in aroundthis knee and into my shinand just like with the hand drillwhen I move this bow I also want toreduce the friction on the string,so you see if I tilt this bow a little bitit separates thosestrings and if I do thatthat means they’re notrubbing against each otherand my string is gonna last a lot longer. So I tilt it down just a little bit,but I’m still moving my righthand parallel to the ground. Start out nice and slow,but all of a suddenyou can see there’s smoke fasterthan there was with the hand drill. Okay, I need to stopnow and remove somethingbecause what happened isthat it’s slipping outbecause there’s this split in the wood,so I’m gonna take two secondsand I’m gonna makeanother notch real quick,so that my spindle doesn’t pop out. You see there’s smoke comingfrom the dust pile so I’mgonna take this stick,put it into the back,hold the ember in placeand remove the hearth board. This ember is what I’m gonna useto transfer to my tinder bundleand then blow that into aflame and there’s my coal. The way you build yourfire is largely influencedby what you’re trying to accomplish. If you want light or heat my go to fireis a by default teepee fire,if you take a burning tinder bundleput it on the ground and slowly beginto lay increasing sizesof wood on top of itit naturally forms a teepee. If you want a fire forlight you want large flames,you have wood that isorganized in such a waythat there’s a lot of air between itand a lot of air between that woodallows for not only introductionof a lot of oxygen, but there’s a lot ofindividual pieces of wood that are actinglike individual pieces of woodand they’re all burningup extremely quicklyand that’s generating a lot of heatand a lot of light, it’s notgenerating a lot of coals. In most situations whenyou want a fire for cookingyou want a good bed of coals. I’ve found the best way to build a fireto cook with is usingthe parallel log method. This method is something I learnedwhile living with the hods in Tanzania,what they explained tome this accomplishedwas it created a bed of coalsin the quickest way possible. So they would start off the same waythey’d begin to start the fire,they’d lay sticks on top of it,it would superficially look like a teepeeuntil it got going and then they’d layall their logs down on top of one anotherin a parallel fashion and they orientedthe direction of the logs withthe direction of the wind,so the winds coming up through the middle. You can only do this once you’ve alreadybuilt up enough coalsto rearrange the fire. This is an ideal fire lay to build upthe largest bed of coalsas quickly as possibleand the reason is because I’ve actuallyclosed down that air gap. I’m laying these logs in close enough,so close that instead ofburning up in huge flamesthey actually burn alittle bit more slowlyand produce those coals, but I do havejust enough of an airgap and allow the windto blow through betweenthese that it’s staying lit. I’ve built up this incredible bed of coalsin no time using the parallel fire method. In order to cook on this fireI need to spread these coals out,gets a nice hot bed ofcoals and in this spotover here I’m gonna put the meatdirectly on top of the coals. Okay, so the meats done. Even though you may never find yourselfin a survival situation I firmly believethat learning and practicingthese primitive skillsare an essential part of connectingwith your past, your environmentand everything that it means to be human.