How To Make a Fire By Rubbing Sticks
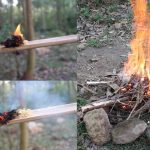
This might be a situation you never thoughtcould happen, but here you are cast away ona deserted island with nothing but the clotheson your back. In this project we’ll be makinga survival fire by rubbing sticks together,because if you can do that, you’ll have amuch better chance of being found alive. Looking around the island, the first thingyou notice are plenty of coconut trees andat the base are some old coconut husks. Thosemight come in handy. There’s also plenty ofwood lying around, so you just need to finda dry piece of a soft wood, like this branchfrom a hibiscus tree. Hibiscus is a very lightweightwood and when it’s this dry, it’s a greatchoice. Your old coconut husk will make agreat tinder bundle because it’s packed withvery fine fibers that should burn easily. Ok, to prepare these sticks for a frictionfire, it’s important that both sticks comefrom the same branch. A sharp rock can beused to fashion some of the wood into a longnarrow stick, cutting the tip of the stickso that it’s slanted at a 45º angle on bothsides. When it’s ready, it should look likesomething like this. Now use your sharp rockto carve a flat spot into the other pieceof wood, knocking it down until you’ve gota surface at least 8 inches long, then makea groove down the center to act as a trackfor guiding the other stick. Ok, the laststep is to wedge anything you can find underthe base to help stabilize it, then go sitdown on the back. It’s time for the action. Taking the shorter stick in your one handlike this, place your other hand overtop sothat the stick nestles in securely at thebase of your thumbs. Ok, when you’ve got thetip set firmly in the grooved track, try pushingit back and forth, keeping it at a 45º angleto the base. Not much pressure is needed yet,so don’t worry about putting too much effortinto it. When the heat of the friction buildsto where the wood is ready, you’ll noticea change in how it feels and might even seea little smoke. At this point, push a littlefaster, and use your strong hand to pull down,adding pressure to the tip. You should seea lot more smoke now, and bits of charredwood dust starting to pile up at the top. Put your back into it and increase the pressure,making sure the tip is stopping just shortof the pile. It looks like you’ve got a littleember burning now, but let’s continue justa little longer to be sure. Hopefully whenyou stop it will keep smoking. Ok perfect,you’ve got a nice little coal. Now, go turnit into a flame. This is a good time to getyour coconut husk ready by pulling apart thefibers. The fluffier they are, the better. Transferring the coal is a delicate process,so try pressing the husk right up to the coal,then turn the ember base over and tap thebottom with a stick to make sure all the emberstransfer out. Nice, your coal has been captured,so loosely cover it over with more fibersso that it’s protected from the wind, andcontinues to smolder. Patience is a virtuehere. You don’t want to pinch it too tightor you’ll smother it out. Too loosely andthe fibers won’t burn. The heat needs to buildslowly, so try to balance the amount of airthe coal is getting, with the quantity oftinder it’s exposed to. The amount of smokebeing generated is a good indication of howwell you’re doing, and sometimes blowing gentlycan help speed the process. When the smokeis thick and you can start to feel the heatradiating, it’s time to get a little moreaggressive. Waive the bundle around to getsome more airflow, and blow right into thecenter of the coals. Just a little more airnow, and success! There’s your flame! Thehardest part is over, but don’t pat yourselfon the back just yet because by the time youadd some wood shavings, your flame may begoing out. Not to worry though, because aslong as the smoke is thick, there’s stilla good amount of heat, and the same techniquescan be used for blowing the coals back intoa flame. Well there you have it. Now you canstart a fire by rubbing sticks together, nowbest of luck getting rescued. If you likedthis project, perhaps you’ll like some ofmy others. Check them out at www. thekingofrandom. com